
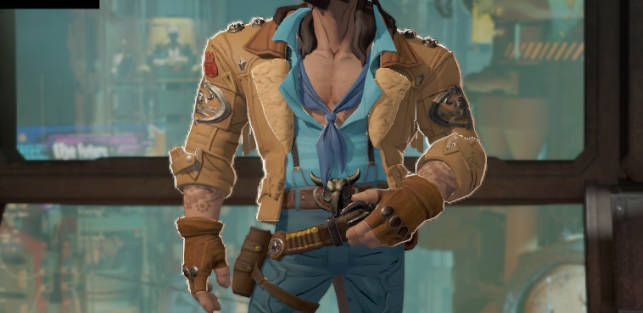
在角色渲染、卡通渲染(Toon Shading)以及影视特效中,边缘光(Rim Light) 是一种常用的增强模型轮廓的视觉手段。传统的边缘光基于法线与视线方向的夹角计算,但在某些场景下会导致边缘光“溢出”到模型内部,不够自然。
本文将介绍两种方案的结合:
-
基于法线与视线方向的边缘光(经典 Rim Light);
-
基于深度图的屏幕空间等宽边缘光(Depth-based Rim Light)。
最终效果是:边缘光能严格控制在物体外轮廓区域,避免出现在模型内部,同时保持宽度一致。
一、传统边缘光(Rim Light)
实现原理
-
核心思路:利用法线与视线方向的夹角来判断是否在边缘。
-
dot(N, V)越小,说明该像素越接近模型轮廓。
-
-
通过
smoothstep控制过渡曲线,得到柔和的边缘光效果。 - 做了受光面与背光面的区别处理
half m_ndl = saturate(dot(inputData.normalWS, light.direction));

half RTD_RL_MAIN = lerp(0.0, 1.0,
    smoothstep( 1.71, lerp(RTD_RL_S_Sli_Dark, RTD_RL_S_Sli_Light, m_ndl),
    pow(abs(1.0 - max(0, dot(inputData.normalWS, inputData.viewDirectionWS))),
        lerp((1.0 - _RimLightUnfillDark), (1.0 - _RimLightUnfillLight), m_ndl))));

half RTD_RL_IL_OO = lerp(0.0, RTD_RL_MAIN, _RimLigInt);

half3 NdLRimColor = lerp(
    _RimLightColorDark.rgb * _RimLightColorPowerDark,
    _RimLightColorLight.rgb * _RimLightColorPowerLight,
    step(0.15, m_ndl));
特点
✅ 优点:
-
计算简单,仅依赖法线与视线向量。
-
易于通过参数调节柔和度与宽度。
❌ 缺点:
-
在模型内部也可能出现亮边(例如衣服褶皱、凹陷处)。
-
边缘宽度不恒定,会随深度与投影畸变而变化。
-
二、屏幕空间基于深度的等宽边缘光
实现原理
-
屏幕空间 UV:从
positionCS转换得到屏幕 UV。 -
视图空间法线偏移:利用法线方向在屏幕空间产生偏移点。
-
深度采样:分别采样中心像素与偏移像素的深度值。
-
深度差异检测:如果深度差异较大,说明这是模型边缘。
-
Rim Mask:通过
smoothstep生成柔和过渡的边缘光 Mask。
// 1. 获取屏幕UV
float2 screenUV = inputData.positionCS.xy / _ScreenParams.xy;

// 2. 世界法线 → 视图空间 → 偏移方向
float3 worldNormal = normalize(normalWS);
float3 viewNormal = normalize(mul((float3x3) UNITY_MATRIX_V, worldNormal));
float2 offsetUV = screenUV + viewNormal.xy * _RimOffsets * 0.01 / inputData.positionCS.w;

// 3. 采样中心 & 偏移的深度
float centerRawDepth = SAMPLE_DEPTH_TEXTURE(_CameraDepthTexture, sampler_CameraDepthTexture, screenUV);
float offsetRawDepth = SAMPLE_DEPTH_TEXTURE(_CameraDepthTexture, sampler_CameraDepthTexture, offsetUV);

// 4. 线性化深度
float centerLinearDepth = LinearEyeDepth(centerRawDepth, _ZBufferParams);
float offsetLinearDepth = LinearEyeDepth(offsetRawDepth, _ZBufferParams);

// 5. 深度差异 → 边缘 Mask
float depthDiff = abs(offsetLinearDepth - centerLinearDepth);
float rimMask = smoothstep(0.01, 0.1, depthDiff);
特点
✅ 优点:
-
只会在模型外轮廓处出现边缘光。
-
边缘宽度与深度无关,屏幕空间上保持一致。
❌ 缺点:
-
多了一次深度采样,会增加显存带宽开销。
-
偏移采样方向依赖法线,在某些角度会出现不稳定。
三、两种方法的结合
在实际项目中,可以将 法线 Rim Light 与 深度 Rim Light 结合:
-
法线 Rim Light 提供基础的轮廓感与过渡;
-
深度 Rim Light 确保边缘光只出现在物体轮廓,不渗入模型内部。
最终实现:
half RTD_RL_IL_OO = ...;      // 法线 Rim 强度
float rimMask = ...;          // 深度 Rim Mask
half finalRim = lerp(0, RTD_RL_IL_OO, rimMask);

lightingData.additionalLightsColor = lerp(
    lightingData.additionalLightsColor,
    lightingData.additionalLightsColor + NdLRimColor,
    finalRim);
这样,我们既保留了传统边缘光的柔和渐变,又利用深度检测消除了模型内部的溢出问题。
四、应用场景
-
卡通渲染:让角色的外轮廓有明显的高光边缘。
-
科幻材质:能量护盾、光效溢出效果。
-
电影渲染:强调人物边缘与背景的分离。
五、总结
-
传统 Rim Light:快速,依赖法线与视线,适合大多数情况。
-
深度 Rim Light:严格控制边缘,仅在物体轮廓出现,保证一致性。
-
二者结合:兼顾表现力与准确性,是更通用的方案。
完整代码:
#if defined(_RIMLIGHT)
    half RTD_RL_S_Sli_Light = lerp(1.70,0.29,_RimLightSoftnessLight);
    half RTD_RL_S_Sli_Dark = lerp(1.70,0.29,_RimLightSoftnessDark);
    half m_ndl =saturate(dot(inputData.normalWS, light.direction));
    half RTD_RL_MAIN = lerp(0.0, 1.0,
        smoothstep( 1.71, lerp(RTD_RL_S_Sli_Dark, RTD_RL_S_Sli_Light, m_ndl),
        pow(abs( 1.0-max(0,dot(inputData.normalWS, inputData.viewDirectionWS))), lerp((1.0 - _RimLightUnfillDark), (1.0 - _RimLightUnfillLight), m_ndl)) ));
    half RTD_RL_IL_OO = lerp( 0.0, RTD_RL_MAIN, _RimLigInt);
    half3 NdLRimColor = lerp(_RimLightColorDark.rgb * _RimLightColorPowerDark, _RimLightColorLight.rgb * _RimLightColorPowerLight, step(0.15,m_ndl));
 //==========================================================================================
 // 屏幕空间深度等宽边缘光
 // 屏幕空间UV
     #if defined(_RIMDEPTH)
        // 1. 获取标准化屏幕UV(NDC → UV)
        float2 screenUV = inputData.positionCS.xy / _ScreenParams.xy;
        // 2. 使用世界法线,转换到视图空间作为偏移方向
        float3 worldNormal = normalize(normalWS);
        float3 viewNormal = normalize(mul((float3x3) UNITY_MATRIX_V, worldNormal)); // 转为视图空间
        float2 offsetUV = screenUV + viewNormal.xy * _RimOffsets * 0.01 / inputData.positionCS.w; // 视角矫正偏移

        // 3. 采样中心和偏移位置的深度
        float centerRawDepth = SAMPLE_DEPTH_TEXTURE(_CameraDepthTexture, sampler_CameraDepthTexture, screenUV);
        float offsetRawDepth = SAMPLE_DEPTH_TEXTURE(_CameraDepthTexture, sampler_CameraDepthTexture, offsetUV);

        // 4. 线性化深度
        float centerLinearDepth = LinearEyeDepth(centerRawDepth, _ZBufferParams);
        float offsetLinearDepth = LinearEyeDepth(offsetRawDepth, _ZBufferParams);

        // 5. 边缘检测,使用 smoothstep 柔和控制
        float depthDiff = abs(offsetLinearDepth - centerLinearDepth);
        float rimMask = smoothstep(0.01, 0.1, depthDiff); // 范围可调

        // 6. 最终 rim 强度
        half finalRim = lerp(0, RTD_RL_IL_OO, rimMask); // RTD_RL_IL_OO 为最大边缘光强度
        lightingData.additionalLightsColor = lerp(lightingData.additionalLightsColor, lightingData.additionalLightsColor + NdLRimColor, finalRim);
    #endif
lightingData.additionalLightsColor = lerp(lightingData.additionalLightsColor, lightingData.additionalLightsColor + NdLRimColor, RTD_RL_IL_OO);
#endif


-DrawMe.png)
暂无评论内容